Why database should be taught before programming in universities?

Database Programming
Learn Database before Coding

Often students from the initial semester ask me how do we store our data in our programming projects? When students join university to learn about computer science and technology they are usually taught programming first in courses like introduction to programming. As part of the coursework, students are required to work on a project. The majority of the projects, in fact almost all projects involve data handling and that data needs to be stored somewhere, usually in databases.

Problems Students Face

As a novice students don’t know how to store data. One option is to store data in plain text files if filing is taught to them but in that case, their project becomes too complex for them. In my opinion, file format is an advanced topic for students that have just started learning how to program. So, students get stuck on where and how to store data. They create variables and arrays to store data in memory but that is not very useful until they have the option to store their data somewhere permanently that they can retrieve later. Otherwise, every time they run their project they have to feed data from the beginning.

Teach Database Before Programming

If universities modify their courses and add database in the first semester and replace programming courses with it then it would be easier for students to get started in computer science degree. Introduction to databases is a relatively easier course than programming and students will know what a database is, how to store data in the database, and how to retrieve it later using SQL. Then in the next semester if they do a programming course then it will require only one lecture to teach them how to access a database from your code and how to store and retrieve data. That will make their projects more valuable and make more sense to them and they can take it to an advanced level in forthcoming courses.

Your Take?

What is your opinion? Please, let me know in the comments.

Click here to read more about Databases.

Mark parent category menu active on single custom post view in WordPress

Recently I developed a theme for one of my clients and I had to highlight the menu item of the parent category in the main menu when one of its associated single custom posts was viewed. For that, I had to add an action in my functions.php file for nav_menu_css_class. It returns the ‘active’ class, which WordPress adds to the parent category menu item in the main menu. You can see the code at Gist here or below.

<?php

add_action('nav_menu_css_class', 'add_current_nav_class', 10, 2 );

function add_current_nav_class($classes, $item) {
// Getting the current post details
global $post;

// Getting the post type of the current post
$current_post_type = get_post_type_object(get_post_type($post->ID));
$current_post_type_slug = $current_post_type->rewrite['slug'];

// Getting the URL of the menu item
$menu_slug = strtolower(trim($item->url));

// If the menu item URL contains the current post types slug add the current-menu-item class
if (strpos($menu_slug,$current_post_type_slug) !== false) {
$classes[] = 'active';
}

// Return the corrected set of classes to be added to the menu item
return $classes;
}
?>

Adding above code in you functions.php file will do the trick.

Click here to read more on WordPress.

Different color for each menu item in WordPress

In a recent project, I got a requirement that each menu item should be highlighted in a different color when visited. The menu items and their required active colors were:

  • Home – Green
  • Portfolio – Blue
  • Team – Yellow
  • Contact – Red

These colors were to be applied only when that page is being visited otherwise color of the menu item should be the default black color.

So, if a user is visiting the home page then the menu item should something like this

home_menu.png

And if the user is visiting the Portfolio page then the menu should be something like this

portoflio_menu.png

Considering that this was a WordPress theme project where we were using Understrap as a base theme which is based on Twitter Bootstrap. So, when user visits, for example, a home page WordPress will attach a .active CSS class to it. Taking advantage of that we added different classes for each menu item and then used the following rule to make menu item colors different:

.navbar-nav > .home.active > a {
    color: green!important;
}
.navbar-nav > .portfolio.active > a {
    color: blue!important;
}
.navbar-nav > .team.active > a {
    color: yellow!important;
}
.navbar-nav > .connect.active > a {
    color: red!important;
}

CSS Class Chaining Method

We utilized the class chaining method here. If you note that .home.active classes are chained together without space and which means it will select an element with both these classes.
That did the trick and all menu items were in a different color.

Sharing data between Laravel and Angular

When building applications with Laravel and Angular you might come across a problem where you want to print data using AngularJS brackets {{}} but before it can be parsed by Angular, Laravel blade engine parses it and tries to replace the value if it finds one. Otherwise, Laravel will start complaining about the variables. To solve that you just need to prepend brackets with @ sign so the blade engine knows that you just need to ignore this expression and AngularJS will take care of it. And AngularJS will parse it and replace the variables with actual data.

Below is a sample snippet to do this:

@{{ article.body }}

In this snippet, the Laravel blade engine will ignore this and AngularJS will parse it and replace it with the article.body data it has.

Click here to read more about Laravel and Angular.

Laravel: Specified key was too long error on migration

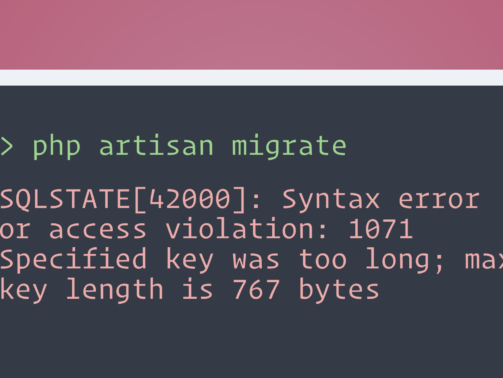
When you install a new Laravel project with ‘laravel new’ and run the migration that comes with it you might get the following error:

#php artisan migrate
Migration table created successfully.


 [Illuminate\Database\QueryException]
 SQLSTATE[42000]: Syntax error or access violation: 1071 Specified key was too long; max key length is 767 bytes (SQL: alter table `users` add unique `users_email_unique`(`email`))

[PDOException]
 SQLSTATE[42000]: Syntax error or access violation: 1071 Specified key was too long; max key length is 767 bytes

To solve this error edit your app/Providers/AppServiceProvider.php file.

Add the namespace:

use Illuminate\Support\Facades\Schema;

and then add the following line in boot() method of your AppServiceProvider class.

use Illuminate\Support\Facades\Schema;

class AppServiceProvider extends ServiceProvider
{
 /**
 * Bootstrap any application services.
 *
 * @return void
 */
 public function boot()
 {
   Schema::defaultStringLength(191);
 } 
}

This should solve your problem. Just delete all the tables and rerun the migration.

Click here to read more about Laravel.

Setup CodeIgniter Docker container for development

Docker

Docker is the world’s leading software container platform. Developers use Docker to eliminate “works on my machine” problems when collaborating on code with co-workers. Operators use Docker to run and manage apps side-by-side in isolated containers to get better compute density. Enterprises use Docker to build agile software delivery pipelines to ship new features faster, more securely and with confidence for both Linux and Windows Server apps. If you want to learn more about Docker head to their What is Docker section here.

CodeIgniter

CodeIgniter is a powerful PHP framework with a very small footprint, built for developers who need a simple and elegant toolkit to create full-featured web applications. If you want to learn more then head to their official website which has great documentation as well at https://codeigniter.com/

CodeIgniter on Docker

If you’re excited about using Docker for your development and you are working on a CodeIgniter (CI) based PHP project then you are lucky. It is very easy to setup CI based project with Docker. Just follow the instructions below to setup a fresh CI project with Docker.

docker-compose up -d

It will spin up two containers—one for the app itself with Nginx and another for MariaDB for your DB. App container will create a directory in your project folder and install CodeIgniter in it.

Now browse http://localhost:8000 in your browser and you’ll see the CodeIgniter page. It’s that easy.

Click here to read more about Docker.

One reason why you should refactor your code often

Once upon a time, a consultant made a visit to a development project. The consultant looked at some of the code that had been written; there was a class hierarchy at the center of the system. As he wandered through the hierarchy, the consultant saw that it was rather messy. The higher level classes made certain assumptions about how the classes would work, assumptions that were embodied in inherited code. That code didn’t suit all the subclasses, however, and was overridden quite heavily. If the superclass had been modified a little, then much less overriding would have been necessary. In other places, some of the intentions of the superclass had not been properly understood, and the behaviour present in the superclass was duplicated. In yet other places several subclasses did the same thing with code that could clearly be moved up the hierarchy.

The consultant recommended to the project management that the code be looked at and cleaned up, but the project management didn’t seem enthusiastic. The code seemed to work and there were considerable schedule pressures. The managers said they would get around to it at some later point.

The consultant had also shown the programmers who had worked on the hierarchy what was
going on. The programmers were keen and saw the problem. They knew that it wasn’t really their fault; sometimes a new pair of eyes is needed to spot the problem. So the programmers spent a day or two cleaning up the hierarchy. When they were finished, the programmers removed half the code in the hierarchy without reducing its functionality. They were pleased with the result and found that it became quicker and easier both to add new classes to the hierarchy and to use the classes in the rest of the system.

The project management was not pleased. Schedules were tight and there was a lot of work to
do. These two programmers had spent two days doing work that had done nothing to add the
many features the system had to deliver in a few months’ time. The old code had worked just fine. So the design was a bit more “pure” and a bit more “clean.” The project had to ship code that worked, not code that would please an academic. The consultant suggested that this cleaning up be done on other central parts of the system. Such an activity might halt the project for a week or two. All this activity was devoted to making the code look better, not to make it do anything that it didn’t already do.

How do you feel about this story? Do you think the consultant was right to suggest further clean-up? Or do you follow that old engineering adage, “if it works, don’t fix it”?

Six months later the project failed, in large part because the code was too complex to debug or to tune to acceptable performance. The consultant was brought in to restart the project, an exercise that involved rewriting almost the whole system from scratch. He did several things differently, but one of the most important was to insist on continuous cleaning up of the code using refactoring.

This is an excerpt from the book preface “Refactoring – by Martin Fowler”.

Create your first real-time AngularJS application

In my previous article I talked about creating real-time PHP application. That was on the server side and I demonstrated a very very basic client to connect with it. Let’s take that to next step and create a Javascript client with AngularJS.

Code

angular-client.html


<html>
 <head>
 css/bootstrap.min.css" rel="stylesheet">


 <script src="angular-client.js"></script>
<style>
 body { margin-top: 10px; }
 input.message { height: 30px; }
 </style>
 </head>
 AppCtrl">
 <form class="form-inline">
 <button ng-click="connect()" class="btn">Connect</button>
 <input type="text" ng-model="text" placeholder="input message to send" class="message"></input>
 <button ng-click="send()" class="btn">send</button>
 </form>
 
 <table class="table table-striped">
 <tr ng-repeat="message in messages">
 <td>{{message}}</td>
 </tr
 </table>
 </body>
</html>

angular-client.js


var app = angular.module('app', []);
app.factory('ChatService', function() {
 var service = {};
 
 service.connect = function() {
 if(service.ws) { return; }
 
 var ws = new WebSocket("ws://localhost:8080");
 
 ws.onopen = function() {
 service.callback("Succeeded to open a connection");
 };
 
 ws.onerror = function() {
 service.callback("Failed to open a connection");
 }
 
 ws.onmessage = function(message) {
 service.callback(message.data);
 };
 
 service.ws = ws;
 }
 
 service.send = function(message) {
 service.ws.send(message);
 }
 
 service.subscribe = function(callback) {
 service.callback = callback;
 }
 
 return service;
});
 
 
app.controller('AppCtrl', ['$scope', 'ChatService', function($scope, ChatService) {
 $scope.messages = [];
 
 ChatService.subscribe(function(message) {
 $scope.messages.push(message);
 $scope.$apply();
 });
 
 $scope.connect = function() {
 ChatService.connect();
 }
 
 $scope.send = function() {
 ChatService.send($scope.text);
 $scope.text = "";
 }
}]);


Details

It is pretty straightforward. We created an Angular Service and consumed that in our Angular controller. The only purpose of Angular service is handling communication. It will hand over the message to the subscriber in our case Angular controller and controller can do anything with that message. Here since we demonstrated the chat application so controller displays that message received.

That’s it! so simple.

Note: Both HTML and Javascript files are also available on Gist.

Code was referenced from here.

How can I test if mod_rewrite on my server is enabled and working?

Note that mod_rewrite can only be used with the web server Apache. Follow the instructions below to check whether module mod_rewrite is installed and correctly configured on your server.

Create the file .htaccess and add these two lines

RewriteEngine on
RewriteRule ^testing.php$ modrewrite.php

This tells the webserver to load modrewrite.php when testing.php is requested.

Create the file modrewrite.php with this line

<?php echo "mod_rewrite works"; ?>

Create the file testing.php with this line

<?php echo "mod_rewrite does not work"; ?>

Now use your web browser to load testing.php. If you see “mod_rewrite works” your server has a working mod_rewrite instance. If you see anything else, including an internal server error, your server is not configured correctly for mod_rewrite.

Click here to read more about web development and devops.

Eclox Doxygen Plugin for Eclipse

Eclox ( http://home.gna.org/eclox ) is an Eclipse plugin that implements a simple interface to the system Doxygen . The objective of Eclox is to provide a light level of integration of the process of software documentation within Eclipse through a user interface that hides the“complexity” of Doxygen. In Figure 1 there is shown a functional diagram of Eclox.

Figure 1 Schematic diagram of the plugin Eclox.

Figure 1 Schematic diagram of the plugin Eclox.

The points of greatest strengths are the ease of creating and managing Doxyfile through the user interface, integrated doxygen invocation and then processing the output from Doxygen directly on the standard Eclipse console.

Unfortunately, by December 2009 the development and maintenance of Eclox was discontinued. The version currently available is 0.8.0, declared compatible with the version of Eclipse 3.3.xe later. Personally I installed the latest version of Eclipse PDT Eclox without any problem.

The current version of Eclox if I remember correctly is based on version 1.5 by Doxygen, however this does not affect the operation of the plugin even on a higher version of Doxygen (as in my case I installed on my machine version 1.8 by Doxygen ) unless it intends to use special features of Doxygen introduced with later versions to 1.5.

Going directly to the practice, build the documentation with the help of this tool is very simple, the steps are:

  • Make sure you have Doxygen installed and configured correctly;
  • Install the plugin on Eclipse Eclox following the standard procedure or follow the directions provided on that page http://home.gna.org/eclox/ # download ;
  • Configure the plugin. This operation is necessary when the plugin can not find on the system you install Doxygen, maybe because it was not installed in a standard place or the installation of Doxygen is not defined in the environment variable PATH ;
  • Create Doxyfile in your project that you want to generate documentation;
  • Run the process of creating documentation.

In these cases the pictures are worth a thousand words written, it is then shown to follow a series of images that summarize the previous scheme. The process remains valid for all operating platforms.

Figure 2 Progress of the installation process of the plugin Eclox.

Figure 2 Progress of the installation process of the plugin Eclox.

Figure 3 Configuration of the installation path of Doxygen.

Figure 3 Configuration of the installation path of Doxygen.

Figure 4 Creating Doxyfile from the menu File -> New -> Doxyfile.

Figure 4 Creating Doxyfile from the menu File -> New -> Doxyfile.

Figure 5 Interface (basic mode) for editing the Doxyfile.

Figure 5 Interface (basic mode) for editing the Doxyfile.

The interface in the basic mode shown in Figure 5 is almost similar to the Doxygen GUI natively installed with Doxygen.

Figure 6 Interface (advanced mode) for editing the Doxyfile.

Figure 6 Interface (advanced mode) for editing the Doxyfile.

The interface in advanced mode allows you to have access to all configuration parameters for the engine Doxygen, how useful for some special uses, such as customizing the CSS for output in HTML format. For more “geeks” you can view the source of Doxyfile generated through the GUI, just open the file with your text editor (see Figure 7).

Figure 7 Doxyfile opened with a simple text editor for Eclipse.

Figure 7 Doxyfile opened with a simple text editor for Eclipse.

Figure 8 Execution of the command to generate the documentation.

Figure 8 Execution of the command to generate the documentation.

The command Build Documentation of the context menu start Doxygen on the basis of the configuration previously set (Doxyfile). The progression of the process of creating documentation is shown on the Eclipse Console (see Figure 9).

Figure 9 Output console Doxygen during the processing of the source code.

Figure 9 Output console Doxygen during the processing of the source code.

In the following figures (Figure 10, Figure 11 and Figure 12) you can check the result obtained by the process of generation of documentation. Man and HTML output formats are required during configuration. Note are localized versions of the documentation for both formats.

Figure 10 Result of the process of creating documentation in HTML format.

Figure 10 Result of the process of creating documentation in HTML format.

Figure 11 Example of Ajax on the research project documentation.

Figure 11 Example of Ajax on the research project documentation.

Figure 12 Result of the process of creation of documentation in Man

Figure 12 Result of the process of creation of documentation in Man

Its true that Eclox about a year ago is no longer maintained, I still think that can be a valuable tool to support developers who need to use Doxygen to generate documentation of your source code.