How to undo the last git commit?

There are situations where you just committed a change in git and just after that realized you made a mistake in the last git commit. If you haven’t pushed that code then the last local changes can be undone with the following command.

git reset --soft HEAD~1

What this does is that it uncommits the last git commit and puts that back in a staged state. That means if you run the git status command then you will see those changes in your working directory. Now you can make further changes to that revision and then commit again.

See the complete documentation about git-reset on the official site.

Read more posts about git here.

Creating Git branch in detached HEAD State

git detached head

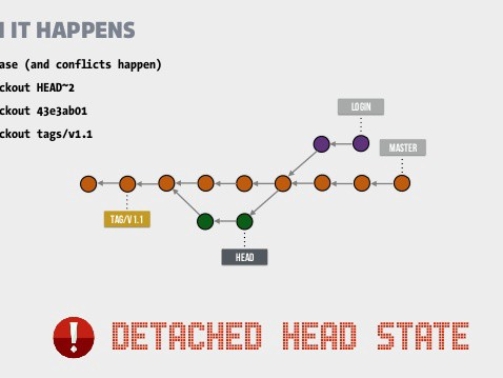
Recently, I came across a situation where I checked out a git branch and it showed me this message related to detached HEAD state:

You are in 'detached HEAD' state. You can look around, make experimental changes and commit them, and you can discard any commits you make in this state without impacting any branches by performing another checkout.

I guess this happened because the branch that I was checking out was rebased. Otherwise, it usually happens when you checkout a commit with its hash. But in my case, I was checking out a branch. Anyway, this is a special state called “detached HEAD”. While you can commit changes in this state, those commits don’t belong to any branch and will become inaccessible as soon as you check out another branch. But what if you do want to keep those commits?

The answer, unsurprisingly, is to use the “checkout” command again and you can use the same branch again:

git checkout <branch> #now you're in detached head state
# do some work and stage it
git add --all
git commit -m "add some work while in detached head state"
git branch <branch>
git checkout <branch>

Pretty easy, right?

Read more articles related to git here.

Codenvy and BitBucket Integration

OK, this post is a quick one about BitBucket integration. Let’s go!

In your Codenvy workspace go to Profile > Preferences > SSH > VCS and generate a key and give it the name bitbucket.org. This will generate a key for you. Copy this key by viewing it which we will use later on BitBucket.

Now go to BitBucket, select your repository, and then go to repository settings. Under the Access Keys menu click Add Key button. Give a label as bitbucket.org and paste the key copied in the previous step here and save.

Now on the Codenvy project go to the Git menu and add remote. You need to give the SSH URL to your BitBucket repo here. Add it and you can now pull the repo from BitBucket. Awesome!

Click here to read more about git on the Ibexoft blog.

List of FREE services & tools Startups should be using

I have curated a list of free tools, services, and apps that startups could and in fact should use to grow at the initial stage. Free doesn’t mean they lack quality, instead, these free tools are from top-notch companies like RedHat, Google, Asana, and GitHub and in all areas from infrastructure to version controlling to marketing and sales to project management.

Have a look at this list here and don’t forget to give your feedback.

I compiled this list a long time ago and recently updated it but it still might have some outdated links that I didn’t get a chance to update yet. Feel free to let me know and I’ll update it.

Enjoy!

Subscribe to get updates from our blog.

git – the simple guide

create a new repository

create a new directory, open it and perform a
git init
to create a new git repository.

checkout a repository

create a working copy of a local repository by running the command
git clone /path/to/repository
when using a remote server, your command will be
git clone [email protected]:/path/to/repository

workflow

your local repository consists of three “trees” maintained by git. the first one is your Working Directory which holds the actual files. the second one is the Index which acts as a staging area and finally theHEAD which points to the last commit you’ve made.

add & commit

You can propose changes (add it to the Index) using
git add <filename>
git add *
This is the first step in the basic git workflow. To actually commit these changes use
git commit -m "Commit message"
Now the file is committed to the HEAD, but not in your remote repository yet.

pushing changes

Your changes are now in the HEAD of your local working copy. To send those changes to your remote repository, execute
git push origin master
Change master to whatever branch you want to push your changes to.

If you have not cloned an existing repository and want to connect your repository to a remote server, you need to add it with
git remote add origin <server>
Now you are able to push your changes to the selected remote server

branching

Branches are used to develop features isolated from each other. Themaster branch is the “default” branch when you create a repository. Use other branches for development and merge them back to the master branch upon completion.

create a new branch named “feature_x” and switch to it using
git checkout -b feature_x
switch back to master
git checkout master
and delete the branch again
git branch -d feature_x
a branch is not available to others unless you push the branch to your remote repository
git push origin <branch>

update & merge

to update your local repository to the newest commit, execute
git pull
in your working directory to fetch and merge remote changes.
to merge another branch into your active branch (e.g. master), use
git merge <branch>
in both cases git tries to auto-merge changes. Unfortunately, this is not always possible and results in conflicts. You are responsible to merge those conflicts manually by editing the files shown by git. After changing, you need to mark them as merged with
git add <filename>
before merging changes, you can also preview them by using
git diff <source_branch> <target_branch>

tagging

it’s recommended to create tags for software releases. this is a known concept, which also exists in SVN. You can create a new tag named 1.0.0by executing
git tag 1.0.0 1b2e1d63ff
the 1b2e1d63ff stands for the first 10 characters of the commit id you want to reference with your tag. You can get the commit id by looking at the…

log

in its simplest form, you can study repository history using.. git log
You can add a lot of parameters to make the log look like what you want. To see only the commits of a certain author:
git log --author=bob
To see a very compressed log where each commit is one line:
git log --pretty=oneline
Or mabe you want to see an ASCII art tree of all the branches, decorated with the names of tags and branches:
git log --graph --oneline --decorate --all
See only which files have changed:
git log --name-status
These are just a few of the possible parameters you can use. For more, see git log --help

replace local changes

In case you did something wrong (which for sure never happens 😉 you can replace local changes using the command
git checkout -- <filename>
this replaces the changes in your working tree with the last content in HEAD. Changes already added to the index, as well as new files, will be kept.

If you instead want to drop all your local changes and commits, fetch the latest history from the server and point your local master branch at it like this
git fetch origin
git reset --hard origin/master

useful hints

built-in git GUI
gitk
use colorful git output
git config color.ui true
show log on just one line per commit
git config format.pretty oneline
use interactive adding
git add -i

Setting up a CVS repository

Setting up a CVS repository is very easy. First create a directory where you want your CVS repository to be located. For example create a folder /cvsroot. Change you directory to /cvsroot and run the following command.

# cvs -d /cvsroot/ init

Obviously, you should have CVS installed. This command will initialize your CVS repository. Remember not to run this command after adding projects/modules, otherwise it will wipe out all your files. After initializing you can add projects to it. Thats it! your CVS repository is ready. Go and add your projects 🙂

CVS account change in Eclipse

We were setting up new development environment for our team using eclipse and checked out the code from CVS. At the end we faced an issue when we tested how other developers will change the CVS account to their own one. Eclipse was not allowing us to change the CVS account. Then I found that we have to change the account in CVS meta files. The command I used to replace the account was :

find . -regex .*CVS/Root -print0 | xargs -0 perl -p -i.orig -e “s/olduser/newuser/;”

This replaced the CVS user name in all CVS meta files in the whole project hierarchy 🙂