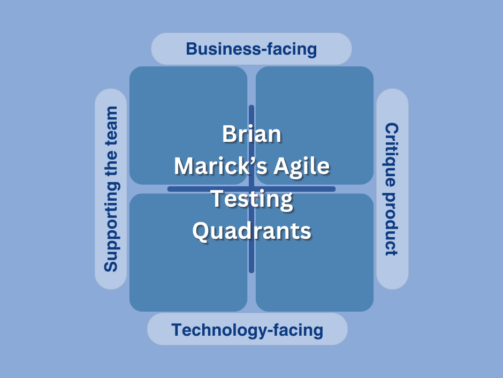
Awesome list of FREE tools Startups should be using

This is a curated list of free tools for everything from productivity to hosting to development tools to designing. These tools are all digital i.e., either app, online service, or downloadable software. Most of them are either free or have limited free option that is enough for startups. Feel free to suggest and contribute to this list.

You can find the original list maintained at GitHub at https://github.com/Ibexoft/awesome-startup-tools-list/.

Tech

Git Repos

Cloud App Hosting:

Static Site Hosting:

DNS, CDN, & SSL:

Site Performance Tools:

Web Scraping Tools

Development IDE/Editors:

Development online platforms/IDEs:

Development Playgrounds

Resource Management Tools

Utilities:

Automated Code Reviews, linting, coding conventions

Testing

Email Service for Developers

Notification (Push, SMS etc) Service for Developers

Changelog

Business, Marketing, Sales, Finance

Idea Validation

Content Management Systems (CMS):

Ecommerce CMS:

Analytics:

Accounting & Finance

CRM:

Team Chat

Customer Support/Live Chat:

Social Media

Sales & Marketing:

Productivity, Management, Organization

Note-taking & Reading:

Project/Task Management:

Attendance, Time Tracking and Management:

Graphics, Design, and Media

Video making:

Stock Photos/Illustrations:

Online Logo:

Designing & Editing:

Mounting NFS Share on Windows 10 & 11 with Write Access

It is easy to mount a drive from Linux NFS share on Windows 10 & 11 machines. To do that make sure you have NFS Client (Services for NFS) installed from Programs and Features. Following is the command to mount the NFS drive. Note that this command will run on cmd (Command Prompt) and not on PowerShell.

mount \<IP_ADDRESS>\<PATH_TO_DIR>\ drive:

For example, if the IP address of the NFS share is 10.235.0.10 and the directory you want to share is /var/www and you want to mount it to your Z drive, then you can run the following command.

mount \\10.235.0.10\var\www z:

But when you mount the drive you can browse the files using your Windows Explorer but you cannot create new files or edit any files.

How to enable write access on NFS share?

To get write access on NFS share you have to make a small change in the Windows registry before mounting the drive. Follow these steps.

  1. Open regedit by typing it in the search box end pressing Enter.
  2. Browse to HKEY_LOCAL_MACHINE\SOFTWARE\Microsoft\ClientForNFS\CurrentVersion\Default.
  3. Create a new New DWORD (32-bit) Value inside the Default folder named AnonymousUid and assign the UID found on the Linux directory as shared by the NFS system. This is the UID of the user that has the write access to that directory on the Linux system.
  4. Create a new New DWORD (32-bit) Value inside the Default folder named AnonymousGid and assign the GID found on the Linux directory as shared by the NFS system. This is the GID of the group that has the write access to the directory on the Linux system.
  5. Restart the NFS client or reboot the machine to apply the changes.

Now run the mount command and you will get the write access.

Click here to read more about Microsoft Windows.

And click here to read more about Linux. 

Displaying Multiline Title in WordPress

In WordPress when the title is written it is usually displayed in a single line on front-end until it is too long to display in one line. But if you want to write the title in multiline and want to line break the title after a certain word how can you do that?

It is pretty simple. Since we know the fact that when the title is displayed it is a heading which is displayed using an HTML tag of course. So, taking benefit of HTML we can just insert an HTML line break element <br/> just after the word in our title where we want the line break. Like this:

“This is my title <br/> with my own line break”

WordPress Multiline Title

This will be displayed in two lines when you publish the post.

Read more about WordPress.

Different color for each menu item in WordPress

In a recent project, I got a requirement that each menu item should be highlighted in a different color when visited. The menu items and their required active colors were:

  • Home – Green
  • Portfolio – Blue
  • Team – Yellow
  • Contact – Red

These colors were to be applied only when that page is being visited otherwise color of the menu item should be the default black color.

So, if a user is visiting the home page then the menu item should something like this

home_menu.png

And if the user is visiting the Portfolio page then the menu should be something like this

portoflio_menu.png

Considering that this was a WordPress theme project where we were using Understrap as a base theme which is based on Twitter Bootstrap. So, when user visits, for example, a home page WordPress will attach a .active CSS class to it. Taking advantage of that we added different classes for each menu item and then used the following rule to make menu item colors different:

.navbar-nav > .home.active > a {
    color: green!important;
}
.navbar-nav > .portfolio.active > a {
    color: blue!important;
}
.navbar-nav > .team.active > a {
    color: yellow!important;
}
.navbar-nav > .connect.active > a {
    color: red!important;
}

CSS Class Chaining Method

We utilized the class chaining method here. If you note that .home.active classes are chained together without space and which means it will select an element with both these classes.
That did the trick and all menu items were in a different color.

Rollover image – Change image on hover/mouse over

Often when designing websites static or dynamic, PHP or ASP.Net, Laravel or WordPress, you have to design in a way that if the user hovers an image it gets changed and an alternate image is displayed. This can be easily achieved via simple HTML events. Here is the trick:

<img src="FIRST IMAGE URL GOES HERE"
onmouseover="this.src='SECOND IMAGE URL GOES HERE'"
onmouseout="this.src='FIRST IMAGE URL GOES HERE - AGAIN'" />

It is simple as that.

Click here to read more tips.

Sharing data between Laravel and Angular

When building applications with Laravel and Angular you might come across a problem where you want to print data using AngularJS brackets {{}} but before it can be parsed by Angular, Laravel blade engine parses it and tries to replace the value if it finds one. Otherwise, Laravel will start complaining about the variables. To solve that you just need to prepend brackets with @ sign so the blade engine knows that you just need to ignore this expression and AngularJS will take care of it. And AngularJS will parse it and replace the variables with actual data.

Below is a sample snippet to do this:

@{{ article.body }}

In this snippet, the Laravel blade engine will ignore this and AngularJS will parse it and replace it with the article.body data it has.

Click here to read more about Laravel and Angular.

How to start E-commerce business in Pakistan? Part-1

It is very impressive how Pakistan is progressing in the field of IT, telecom and broadband penetration. Pakistan’s e-commerce market is growing tremendously and presents great opportunities for everyone.

Pakistan’s broadband penetration has grown to over 40 million (38 million are on 3G/4G), up from just 2 million in April 2014. With more than 45 million smartphones in the market, Pakistan is on track to become one of the largest internet population in the world.

Foreign players and giants like Alibaba group are planning to enter Pakistan’s huge potential market. It is still a rising market and there is a massive potential for small businesses alike.

Why e-commerce?

E-commerce has several advantages over the traditional physical business. A few major benefits are:

  • Low investment as compared to a physical business
  • Can target a wider audience
  • You can start business immediately

Physical vs Online

For a physical business initial investment is huge. You need a place, a shop or an office. If you are going to buy it will cost you millions. If you go for the rental, you will still have to pay a considerable amount in advance and your monthly operational cost will be high. Then there are other one-time costs involved like furniture, lighting, and other stuff. You have to spend a big amount even before you start selling.

As compared to starting an e-commerce business you just need to buy a domain and hosting or go for platforms like Shopify or BigCommerce. You can get your site developed at very cheap rates from freelancers or if you are a power user then you can set up your own site that will cost you free. Few ready-made solutions that are available are:

  • WordPress/WooCommerce
  • OpenCart
  • Prestashop
  • Magento

There are even lot of other solutions available that you can search and try. If you do this on your own it will cost you free.

Setup and Operations cost is low

The next step would be to enter your inventory in your e-commerce store. That shouldn’t take more time. It could even be done sooner than setting up a physical shop. Due to this, you can start an online business immediately as compared to a physical store.

Target wider audience

If you have a physical store then you can target only the people in your area or city depending on where you are located. If you are a small businessman with a shop in your locality, your customers could only be from your nearby areas. If you have a shop in a bigger mall or market then your audience would be wider. But if you open an online e-commerce store you can target not only your city but your country, or you can even go international, resulting in huge potential for great revenue.

This is just the tip of the iceberg. But remember you must have some business sense since an online store is also a business. Without business strategy and marketing since you won’t be successful.

In the coming episodes, we’ll talk more about setting up an e-commerce store, the role of technology, business and marketing tips, how to grow your online business and much more.

If you feel this is a good read and want to read more about a topic you are interested in then feel free to leave me feedback and I’ll add it to my upcoming topics list.

Setup CodeIgniter Docker container for development

Docker

Docker is the world’s leading software container platform. Developers use Docker to eliminate “works on my machine” problems when collaborating on code with co-workers. Operators use Docker to run and manage apps side-by-side in isolated containers to get better compute density. Enterprises use Docker to build agile software delivery pipelines to ship new features faster, more securely and with confidence for both Linux and Windows Server apps. If you want to learn more about Docker head to their What is Docker section here.

CodeIgniter

CodeIgniter is a powerful PHP framework with a very small footprint, built for developers who need a simple and elegant toolkit to create full-featured web applications. If you want to learn more then head to their official website which has great documentation as well at https://codeigniter.com/

CodeIgniter on Docker

If you’re excited about using Docker for your development and you are working on a CodeIgniter (CI) based PHP project then you are lucky. It is very easy to setup CI based project with Docker. Just follow the instructions below to setup a fresh CI project with Docker.

docker-compose up -d

It will spin up two containers—one for the app itself with Nginx and another for MariaDB for your DB. App container will create a directory in your project folder and install CodeIgniter in it.

Now browse http://localhost:8000 in your browser and you’ll see the CodeIgniter page. It’s that easy.

Click here to read more about Docker.

Setup Laravel with Docker containers

Docker

Docker has captured my attention lately and has been growing exponentially for last few years. Docker has revolutionized the virtualization space and has given DevOps engineers and developers a new set of tools that can ease their development as well as infrastructure resource utilization. Mostly Node.js apps have been deployed with Docker but it is not limited to only that. If you’ve been developing apps for web using PHP and Laravel framework then you are lucky that community has developed some great tools to utilize docker in their development workflow. If you are new to Docker and want to learn more about Docker then visit their website docker.com specially the section What is Docker?

Laradock

Laradock does the hard part and facilitate developers to quickly and easily setup Laravel development environment in seconds. Follow the these steps to get started.

Setup fresh environment then install Laravel inside docker

  • Create project directory. e.g. myproject
  • Create another directory within myproject directory for source that you will use commit to git repo. eg. app
  • Clone the laradock repo inside myproject folder, this will create laradock folder
git clone https://github.com/laradock/laradock.git
  • Edit the docker-compose.yml file to map to your project directory once you have it (eg. – ../app:/var/www)
  • Run the following command
docker-compose up -d nginx mysql redis beanstalkd
  • Enter the workspace
docker-compose exec workspace bash
  • cd to /var
  • Install Laravel
composer create-project laravel/laravel www
  • Open your .env file and set the following
DB_HOST=mysql
REDIS_HOST=redis
QUEUE_HOST=beanstalkd

Now open your browser and visit http://localhost

You will see running Laravel app. That was cool!

You can also connect to mysql using these settings.

Host: localhost
User: root
Password: root

If you want to add more services see the official laradock docs. It support tons of other services like memcache, pgsql etc.

Daily Use

Following are some docker related commands that you want to use on daily basis once your development environment is setup.

  • To bring up the servers to run application
docker-compose up -d nginx mysql
  • Enter workspace container to run commands like artisan, composer, phpunit, gulp etc.
docker-compose exec workspace bash

or on Windows PowerShell

docker exec -it {containerid} bash
  • List current running containers
docker ps
  • List current project containers
docker-compose ps
  • Close all running containers
docker-compose stop
  • Delete all existing containers
docker-compose down
  • View the log files
docker logs {container-name}

How to use wildcard domain with OpenShift hosting?

If you have a domain name and want to use OpenShift for hosting then using a wildcard domain name is a bit tricky with some domain registrars like GoDaddy. The reason is IP address of the app on OpenShift doesn’t remain the same and to use the wildcard domain a DNS A record is setup with the IP address of the hosting server. So, how do we make sure the following is true:

  • user enters mysitename.com > user sees www.mysitename.com
  • user enters mysitename.com/about.html > user sees www.mysitename.com/about.html

That is, the www prefix is always displayed anywhere on the site.

But due to the non-static IP of the OpenShift app, it is not possible to adjust the A record. But you can set up a CNAME with the following:

www > appname-username.rhcloud.com

where the format for the OpenShift app is

http://appname-username.rhcloud.com.

This means the site is accessible at www.mysitename.com but not at mysitename.com. To make it work you need to do the following.

On domain registrar like GoDaddy
– Create a new Record with
Record Type CNAME
HOST: www
POINT TO: appname-username.rhcloud.com

  • Setup Forwarding
    Forward to: www.mysitename.com
    Redirect: 301 (Permanent)
    Type: Forward only

On Openshift
1. Select Application tab > select application appname-username.rhcloud.com > click change
2. Enter the Domain name www.mysitename.com

That’s it! Wait for 10-15 min and see the magic.